Video Frame Sizes Visualization
Visualize Compressed Video
In this tutorial, we’ll walk through how to use Python and Bokeh to visualize video frame sizes (H.264/AVC, H.265/HEVC, etc.)
and calculate moving average bitrate values from an MPEG TS file.
We’ll use ffprobe to extract frame information and pandas for data manipulation. Finally, we’ll create interactive plots with Bokeh.
Here is what we’ll have as the result.
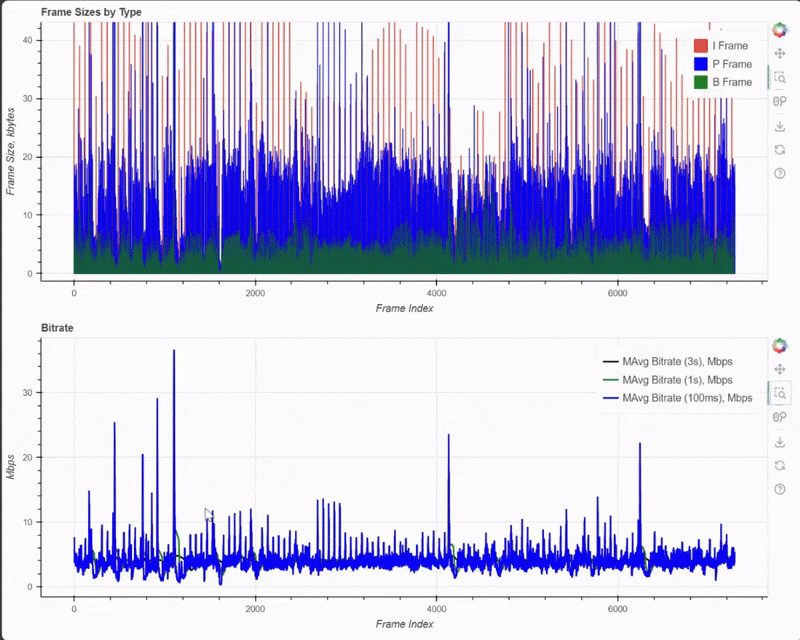
Frame Sizes and Types Bar Chart With MAvg Bitrate Values
❗ The final python script with click for CLI parsing can be found here: [gist].
Prerequisites
Make sure you have the following installed:
- Python 3.x
ffprobe(part of the FFmpeg suite)pandaslibrarybokehlibrary
You can install the required Python libraries using pip:
pip install pandas bokeh
Step 1. Extract Frame Information with FFprobe
First, use FFprobe to extract frame sizes and types from your MPEG TS file. FFprobe is a perfect tool for this: it is free, well maintained and supports a wide range of codecs.
ffprobe -v error -select_streams v:0 -show_entries frame=pkt_pos,pkt_size,pict_type -of csv=p=0 input_file.ts > frame_info.csv
Replace input_file.ts with the path to your MPEG TS file. This command will output the frame position (pkt_pos),
size (pkt_size) and frame type (pict_type) in CSV format using FFprobe’s CSV writer.
The file produced will have frame position, frame size, picture type and two empty columns (for some reason). Note that frames are arranged in a display order. The frame position column can be used to rearrange data in a stream order.
222968,46380,I,,
288768,9202,B,,
298356,5113,B,,
303620,3164,B,,
270908,17308,P,,
Step 2: Load and Process the CSV Data
Next, we’ll load the CSV data into a pandas DataFrame and process it to calculate moving averages and rolling average bitrates.
2.1 Load CSV Data
Let’s create a function to load the CSV data and drop two empty columns in a CSV file produced by FFprobe.
Additionally the data frame is sorted based on frame_pos column to use a stream order.
The function will return a pandas DataFrame.
import pandas as pd

def load_csv(file_path):
    """Load CSV file into a DataFrame and drop empty columns."""
    df = pd.read_csv(file_path, header=None, names=['frame_pos', 'frame_size', 'pict_type', 'empty1', 'empty2'])
    df = df.drop(columns=['empty1', 'empty2'])
    # Convert display order to stream order. Drop the old index to use the new order.
    df = df.sort_values(by='frame_pos').reset_index(drop=True)
    return df
2.2. Calculate Bitrate
Let’s add a function to calculate video bitrate values (moving average) using 3 seconds, 1 second and 100 milliseconds rolling window.
An additional argument fps (frames per second) is required.
def calculate_bitrates(df, fps):
    """Calculate 3s, 1s and 100 ms rolling average bitrate values."""
    fps_div_10 = fps // 10

    # Calculate the rolling sum of 'frame_size' values converted from bytes to megabits.
    df['mbps_mavg_1s'] = df['frame_size'].rolling(window=fps).sum() * 8 / 1e6

    # Similar for 3s moving average.
    df['mbps_mavg_3s'] = df['frame_size'].rolling(window=3*fps).sum() * 8 / 1e6 / 3

    # The same but using 100 millisecond intervals.
    df['mbps_mavg_100ms'] = df['frame_size'].rolling(window=fps_div_10).sum() * 8 / 1e6 * 10 / (fps_div_10 * 10) * fps
    return df
The first missing MAVG values can be calculated using an expanding sum or using the existing data to extrapolate the bitrate, but it is optional.
# Calculate the first missing values of the 'mbps_mavg_1s',
# place them into df['mbps_mavg_1s']
df.loc[:fps, 'mbps_mavg_1s'] = df['frame_size'].expanding(min_periods=1).sum().iloc[:fps] * 8 / 1e6
2.3. Add Kilobyte Frame Sizes
Let’s convert frame sizes to kilobytes to have a nicer plot.
def calculate_kbyte_frame_sizes(df):
    # Convert to kilobytes
    df['frame_size_kBytes'] = df['frame_size'] / 1000
    return df
2.4. Add Color Column
For further visualization let’s use a color to represent a certain frame type:
- Red for an I frame,
- Blue for a P frame,
- Green for a B frame.
def add_color_column(df):
    """Add a color column based on pict_type."""
    colors = {'I': 'red', 'P': 'blue', 'B': 'green'}
    df['color'] = df['pict_type'].map(colors)
    return df
Step 3: Create Interactive Plots with Bokeh
Let’s visualize the data using Bokeh – a Python library for creating interactive visualizations.
The following imports would be required.
from bokeh.plotting import figure, show, output_file
from bokeh.io import output_notebook
from bokeh.transform import factor_cmap
from bokeh.models import Legend, LegendItem
from bokeh.layouts import column
Let’s create a color-coded bar chart for frame sizes.
def create_bar_chart(df):
    """Create a bar chart for frame sizes with color legend."""
    # Create the bar chart figure.
    p1 = figure(x_axis_label='Frame Index', y_axis_label='Frame Size, kbytes', title='Frame Sizes by Type', width=1000, height=400)

    # Add bars to the bar chart figure.
    bars = p1.vbar(x=df.index, top=df['frame_size_kBytes'], width=0.9, color=df['color'])

    # Find the first index of each pict_type
    i_index = df[df['pict_type'] == 'I'].index[0]
    p_index = df[df['pict_type'] == 'P'].index[0]
    b_index = df[df['pict_type'] == 'B'].index[0]

    # Add a legend to describe color meaning.
    legend_items = [
        LegendItem(label="I Frame", renderers=[bars], index=i_index),
        LegendItem(label="P Frame", renderers=[bars], index=p_index),
        LegendItem(label="B Frame", renderers=[bars], index=b_index)
    ]
    legend1 = Legend(items=legend_items, location="top_right")
    p1.add_layout(legend1)

    return p1
Also let’s create a plot for bitrate values. It will be placed right below the bar chart. The x axis of both plots will be synchronized.
def create_bitrates_plot(df, x_range):
    """Create a plot for bitrate values with toggleable lines."""
    # Create the moving average plot figure
    p2 = figure(x_axis_label='Frame Index', y_axis_label='Mbps', title='Bitrate', width=1000, height=400, x_range=x_range)

    # Add the Mbps moving average line to the moving average plot figure
    line1 = p2.line(df.index, df['mbps_mavg_3s'], line_width=2, color='black', legend_label='MAvg Bitrate (3s), Mbps')
    line2 = p2.line(df.index, df['mbps_mavg_1s'], line_width=2, color='green', legend_label='MAvg Bitrate (1s), Mbps')

    # Add the rolling average bitrate line to the moving average plot figure
    line3 = p2.line(df.index, df['mbps_mavg_100ms'], line_width=2, color='blue', legend_label='MAvg Bitrate (100ms), Mbps')

    p2.legend.click_policy = "hide"

    return p2
Now a function to create a plot of frame sizes and bitrate values.
def plot_frame_sizes(df):
    """A function to plot frame sizes using a bar chart and bitrate values right below."""
    p1 = create_bar_chart(df)
    p2 = create_bitrates_plot(df, x_range=p1.x_range)

    # Uncomment if you want to use it in a notebook.
    #output_notebook()
    show(column(p1, p2))
Result
def plot_frame_sizes_from_csv(file_path):
    """A function to plot frame sizes and bitrate values from a CSV file."""
    df = load_csv(file_path)
    df = calculate_bitrates(df)
    df = calculate_kbyte_frame_sizes(df)
    df = add_color_column(df)

    plot_frame_sizes(df)
As the result the following interactive plot will be built:
Frame Sizes and Types Bar Chart With MAvg Bitrate Values
❗ The final python script with click for CLI parsing can be found here: [gist].
Conclusion
By following these steps, you can visualize H.264/AVC, H.265/HEVC etc. frame sizes and calculate moving average bitrate values from an MPEG TS file. The interactive plots created with Bokeh allow you to explore the data and gain insights into the frame sizes and bitrates.
Feel free to modify the code to suit your needs and experiment with different datasets. Happy coding!